Getting started with AT1000
The AT1000 ecosystem is designed to make it easy to create test projects, either by running them directly on the device or by driving the device from your computer.
This page is a quick, minimal "hello world" for getting a brand new AT1000 up and running a simple test sequence. Start by unboxing your AT1000, power it up, and connect it to your computer with a USB cable or to your network with an Ethernet cable. Then follow one of the two paths below to create your first project.
Standalone projects run on the AT1000 inside an isolated container, with no computer needed at run time. They can use the AT1000 API and have access to external USB devices. Start them from the front panel and deploy or duplicate them across devices.
Remote projects run on your computer and drive the device over the network. Use this mode for PC-only tools, CI, or other host-connected equipment.
The SDK API is identical in both modes, and the same code is portable between them (AT1000.isStandalone() / AT1000.findLocalDevice()), so you can start with one path and move to the other later. See Find and connect to AT1000 for details.
Creating a project in standalone mode
Standalone projects are created and managed with the AT1000-Interface desktop utility.
-
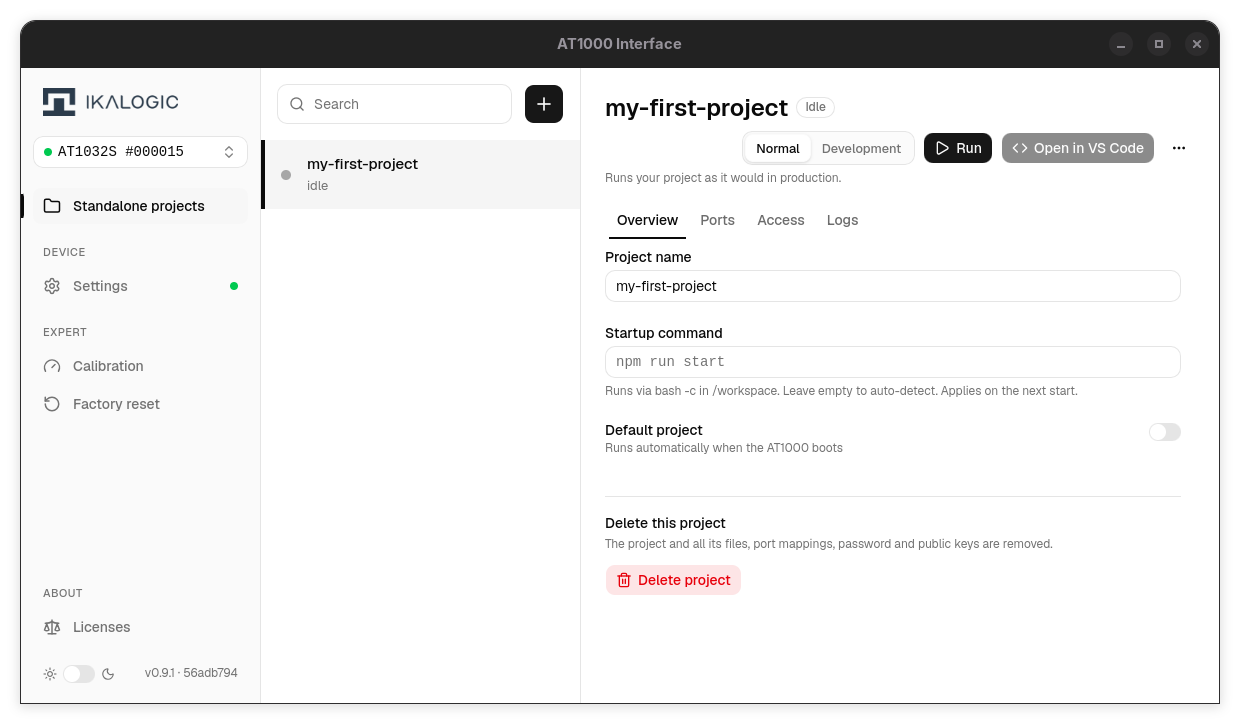
Launch AT1000-Interface and wait for the device to be detected. The device selector at the top of the sidebar selects the first AT1000 it finds; use it to switch to another device. Select Standalone projects in the sidebar: the list on the left shows the projects stored on the device, and the pane on the right shows the selected project.
-
Select + (New project) above the project list. Choose Node.js template or Python template, then select Continue.
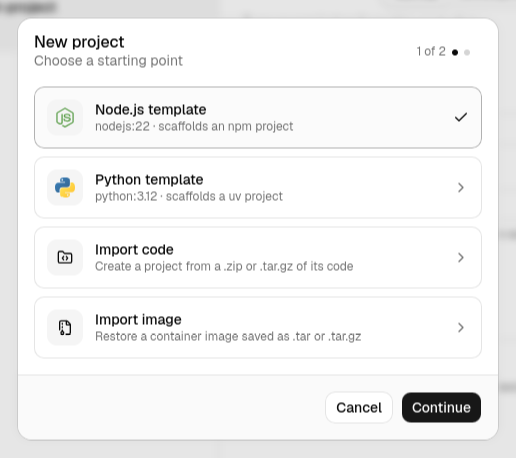
Enter a project name made of lowercase letters, digits and dashes (this guide uses
my-first-project), then select Create project. The Advanced section optionally sets the startup command and makes the project the default one.The other starting points create a project from existing files: Import code uses a
.zip,.tar.gz,.tgzor.tararchive of the project's code, such as one saved with Export code, and Import image restores a container image saved as.tar,.tar.gzor.tgz. -
You now have a container on the device pre-loaded with a demo test sequence: it waits for a knob press, checks a digital test point (GPIO 5), and reports the result on the device's screen and speaker.
-
Run it by selecting Normal, then Run in the project header, or straight from the device's front panel — scroll the project menu with the rotary knob and press to start. To auto-start a project at boot, select the star next to it in the project list, or Set as default in the project's ⋯ menu.
-
Edit the project from VS Code:
- Install VS Code and the Remote-SSH extension.
- Select Development, then Run. This starts the container with SSH access instead of the application. If the project has no port mappings, host port 2222 is mapped to the container's SSH port.
- Select Open in VS Code to open the container's
/workspacefolder over Remote-SSH. If no host port leads to SSH, the interface publishes one first (2222, or the next free port).
VS Code signs in as the container's
devuser, with a public key or a password. On the project's Access tab, select Import public keys to authorize the public keys found in your computer's~/.sshfolder, or Set password to set a password for thedevuser. If your computer has no public key and the project has no password, Open in VS Code opens the Access tab and asks for a password.See Standalone projects for stopping a run, connecting USB devices, and viewing project logs.
Standalone projects require device firmware 0.2.4 or newer. On older firmware, the Standalone projects page shows This device cannot host projects with a link to the firmware settings. See Updating device firmware below.
Updating device firmware
Get AT1000-Interface from the software download page. In the application:
-
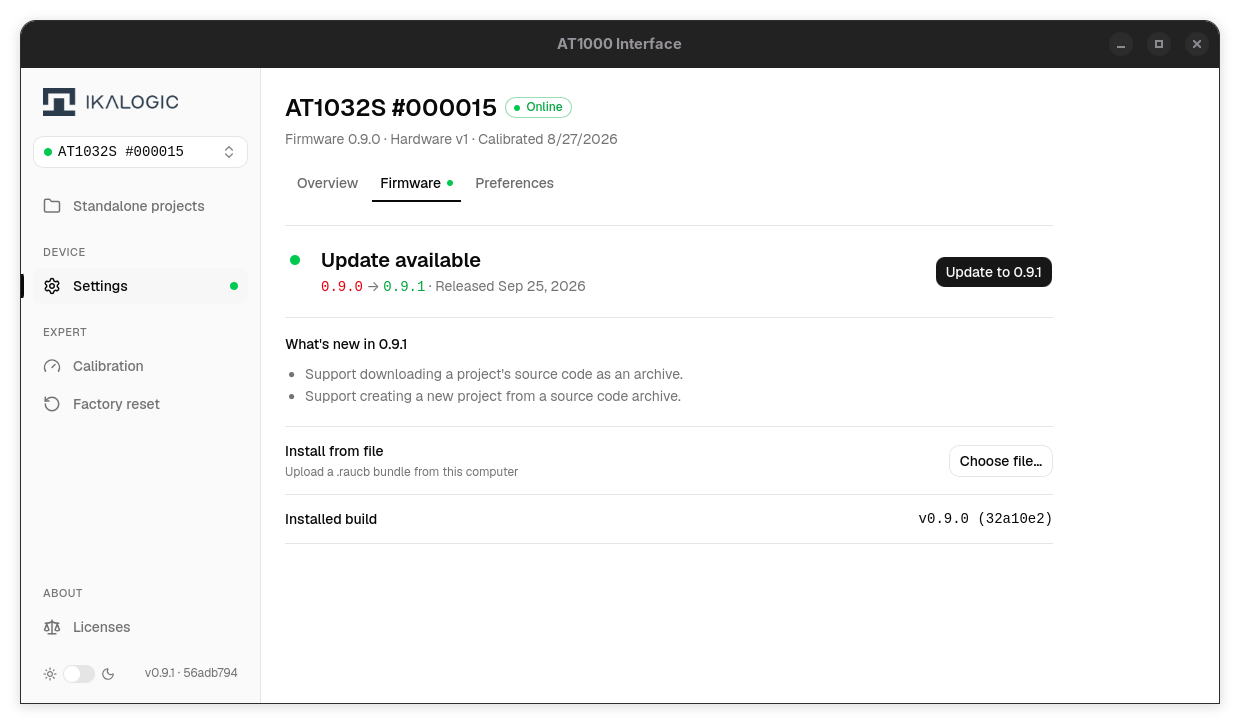
Select the device, select Settings in the sidebar, then open the Firmware tab. A green dot next to Settings and Firmware means an update is available; the Firmware update available notification also opens this tab.
-
Select Update to … to install the latest published firmware, or Choose file… under Install from file to select a
.raucbfile. -
Review the current and target versions under Confirm & Install, then select Install.
-
When installation finishes, select Reboot now under Reboot & Verify to apply the update.
-
Wait for the device to reconnect and the interface to display Successfully updated to v… before continuing.
Creating a new project in remote mode
In remote mode the project is an ordinary Node.js, Python or Rust project on your computer.
Using a project scaffolder (recommended)
- NodeJS
- Python
- Rust
npm create @ikalogic/at1000 my-project
cd my-project
npm run start
The interactive prompts ask for the project name and whether to install dependencies. npm run start compiles and runs the test sequence.
uvx create-ikalogic-at1000 my-project
cd my-project
uv run main.py
This uses uv to scaffold and run the project.
cargo new my-project
cd my-project
cargo add ikalogic-at1000
cargo run
There is no AT1000-specific scaffolder for Rust: cargo new creates the project and cargo add pulls the ikalogic-at1000 crate. Replace src/main.rs with the hello world below.
The generated project contains a ready-to-run demo (src/index.ts / main.py) — knob press → GPIO 5 check → result on the device's screen and speaker — and the same project also runs unmodified as a standalone project on the device.
Setting up a project manually
- NodeJS
- Python
- Rust
mkdir my_test_project
cd my_test_project
npm init -y
npm install @ikalogic/at1000
Set "type": "module" in the generated package.json — the example below uses ES-module imports and top-level await.
mkdir my_test_project
cd my_test_project
python -m venv my_test_env
source my_test_env/bin/activate  # On Windows use `my_test_env\Scripts\activate`
pip install ikalogic-at1000
cargo add ikalogic-at1000
Adds the crate to an existing Cargo project. The SDK is synchronous and needs no async runtime.
Then create the "read back" hello-world below and run it.
- NodeJS
- Python
- Rust
Create test.js and run it with node test.js:
import { AT1000 } from '@ikalogic/at1000';

// Discover AT1000 devices on the network and open the first one
const devices = await AT1000.findDevices();
console.log(`Found ${devices.length} AT1000 device(s).`);

const tester = await AT1000.open(devices[0]); // takes exclusive access
await tester.reset();                         // reset the device to a known state

// Configure D0 as a digital output, then read back what we write
const d0 = tester.gpio.digital(0);
await d0.configure_output({ voh: 3.3, vol: 0, vih: 2.0, vil: 0.8, value: true });

await d0.write(false);
console.log('D0 value (we expect `false`):', await d0.read());

await d0.write(true);
console.log('D0 value (now we expect `true`):', await d0.read());
Create test.py and run it with python test.py:
from ikalogic_at1000 import AT1000

# Discover AT1000 devices on the network and open the first one
devices = AT1000.find_devices(0.5)  # timeout in seconds
print(f"Found {len(devices)} AT1000 device(s).")

tester = AT1000.open(devices[0])  # takes exclusive access
tester.reset()                    # reset the device to a known state

# Configure D0 as a digital output, then read back what we write
d0 = tester.gpio.digital(0)
d0.configure_output(voh=3.3, vol=0, vih=2.0, vil=0.8, value=True)

d0.write(False)
print("D0 value (we expect `False`):", d0.read())

d0.write(True)
print("D0 value (now we expect `True`):", d0.read())
Replace src/main.rs with the following and run it with cargo run:
use ikalogic_at1000::{AT1000, At1000Error, DigitalOutputConfig};
use std::time::Duration;

fn main() -> Result<(), At1000Error> {
    // Discover AT1000 devices on the network and open the first one
    let devices = AT1000::find_devices(Duration::from_millis(500))?;
    println!("Found {} AT1000 device(s).", devices.len());

    let tester = AT1000::open(&devices[0])?; // takes exclusive access
    tester.reset()?; // reset the device to a known state

    // Configure D0 as a digital output, then read back what we write
    let d0 = tester.gpio.digital(0)?;
    d0.configure_output(&DigitalOutputConfig { voh: 3.3, vol: 0.0, vih: Some(2.0), vil: Some(0.8), value: true })?;

    d0.write(false)?;
    println!("D0 value (we expect `false`): {}", d0.read()?);

    d0.write(true)?;
    println!("D0 value (now we expect `true`): {}", d0.read()?);
    Ok(())
}
If everything goes as expected, running the script prints:
Found 1 AT1000 device(s).
D0 value (we expect `false`): false
D0 value (now we expect `true`): true
Next steps
Continue with Find and connect to AT1000 for discovery, opening, and access control, then the per-resource sections (IO, COM, power, relays, HMI).
Use real-time events to react to device changes, or operator prompts to ask for a decision.