Standalone projects
A standalone project runs on the AT1000, with no computer needed at run time. Each project has an isolated Linux environment called a container. Your application files live in the container's /workspace folder.
Use the AT1000-Interface desktop utility to create, edit, and manage projects. If you have not created one yet, follow Create a standalone project.
Select Standalone projects in the AT1000-Interface sidebar to manage the selected device's projects. The list on the left shows each project with its state; search it by name, and select + to create a project. Select a project to open it in the pane on the right. Its header holds the run controls and the ⋯ menu, and its tabs are Overview, Ports, Access and Logs.
Running and stopping a project
- Open AT1000-Interface and select your device.
- Select Standalone projects in the sidebar, then select your project.
- In the project header, choose the run mode, then select Run:
- Normal runs your project as it would in production.
- Development starts the container with SSH access for editing, but does not start the application automatically. Select Open in VS Code to edit
/workspaceand run your application from the terminal.
The project keeps the last mode you ran it in. Selecting the other mode while the project runs asks for confirmation, then restarts it in that mode with Stop and restart.
Starting another project stops the running project first. To run a project without a computer, select it in the front-panel project menu with the rotary knob, then press the knob.
To stop a project, select Stop in the project header. The project shows Stopping… and the run controls stay disabled until the stop finishes. Wait for the final state before taking another action.
From any front-panel screen, hold the knob for more than five seconds to stop the project and return to the menu. Stopping can take up to three additional seconds while the application cleans up. The menu returns only after the project has stopped successfully.
A user-requested stop leaves the project in the idle state, even if the device must force it to stop. An application that exits with an error shows error instead. Stopping an already-failed project does not clear its error state.
Project settings
The Overview tab edits the project's settings. Select Save in the Unsaved changes bar to apply your edits, or Discard to cancel them.
- Project name
- Startup command - runs through
bash -cin/workspacewhen the project starts in Normal mode. Leave it empty to use the command detected from your project, shown in the empty field. A change applies the next time the project starts. - Default project - runs the project automatically when the AT1000 boots
Select Delete project on the Overview tab or in the ⋯ menu to remove the project with all its files, port mappings, password and public keys. A running project is stopped before deletion.
Select Export code in the ⋯ menu to save the project's /workspace folder to your computer as a .zip or .tar.gz archive. Use Import code in the New project dialog to create a project from such an archive.
Handle shutdown in your application
When a project stops, the AT1000 sends SIGINT, an interrupt signal, to the application's processes. They have three seconds to clean up before the device sends SIGKILL to force them to stop.
Handle SIGINT in your application so it can save essential results and release resources. In Python, use KeyboardInterrupt handling and finally blocks as appropriate. Keep cleanup within the three-second limit.
The same shutdown process applies when you select Stop, switch projects, or hold the front-panel knob to regain control. It also applies when a remote application takes control of the AT1000. The remote application receives control only after the project has stopped successfully.
USB devices in a project
Standalone projects can access external USB devices connected to the AT1000, including devices plugged in after the project starts. Use the USB device's Linux, Python, or Node.js library inside the project.
The USB device needs Linux kernel support on the AT1000 and the appropriate libraries installed in the project. If your device needs an additional kernel driver, email Ikalogic support to request its installation on the AT1000. This access is local to the project: it does not expose the USB device to your computer over the network.
To turn USB port power on or off, use tester.power.usb(). Accessing a USB device and controlling its power are separate operations.
Projects created without USB support
USB access is configured when a project container is created or imported. Updating firmware or restarting a container created without USB support does not enable it.
To add USB access while preserving your existing project:
- Select the original project, then select Export code in its ⋯ menu. The archive contains the project's
/workspacefolder, including dependencies installed there, such asnode_modulesor.venv. - Create a replacement project from the archive with Import code, using a different name. If the original project uses a custom startup command, set it under Advanced. Keep the original project until you have verified the replacement.
- Set up the port mappings, password and public keys again. The archive does not contain them, nor anything installed outside
/workspace: reinstall any such dependencies your application needs. - Run the replacement and check that the application can discover and communicate with the USB device.
Open network ports
A network port identifies a service, such as a web dashboard, running in your project. To reach it from another computer, add a port mapping from the AT1000 to the container. Host is the port on the AT1000. Container is the port where your application accepts connections. For example, map host port 8000 to container port 5000 for a project web server. Then open http://AT1032S-<serial-number>.local:8000/ in your browser, replacing <serial-number> with your device's serial number.
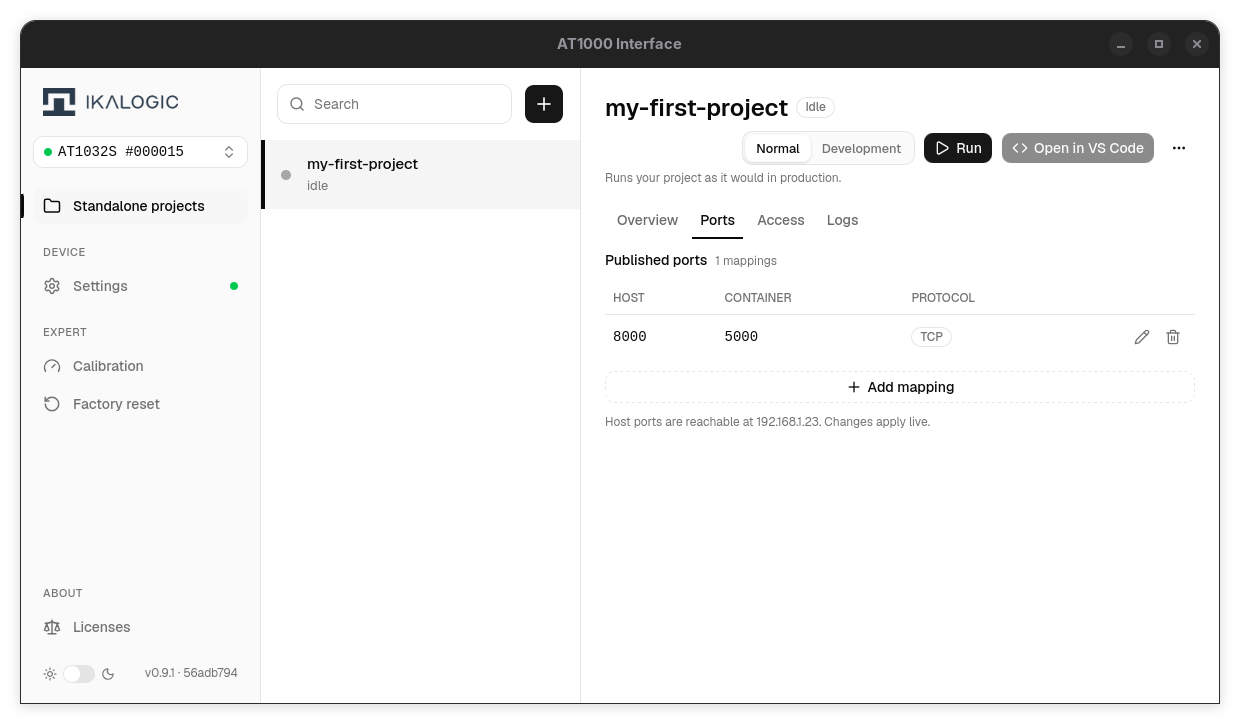
- Select your project, then open the Ports tab.
- Select Add mapping.
- Enter the host and container ports, then select the protocol: TCP for an HTTP server, UDP for a UDP service, or both. Select Add.
- Select Save changes in the Unsaved changes bar.
Use the pencil and trash buttons on a mapping to edit or remove it, then save. Changes apply immediately to a running project, or when it next starts. Use an available host port from 1 to 65535, excluding 22 and 8080, which the AT1000 reserves. Configure your service to listen on the container's network interface (for example, 0.0.0.0). A service that listens only on localhost cannot accept these connections.
Connect to the project over SSH
Once the project is running in development mode, its container accepts SSH connections as the dev user at AT1032S-<serial-number>.local, on the host port mapped to the container's port 22. Open the project's Access tab to set it up.
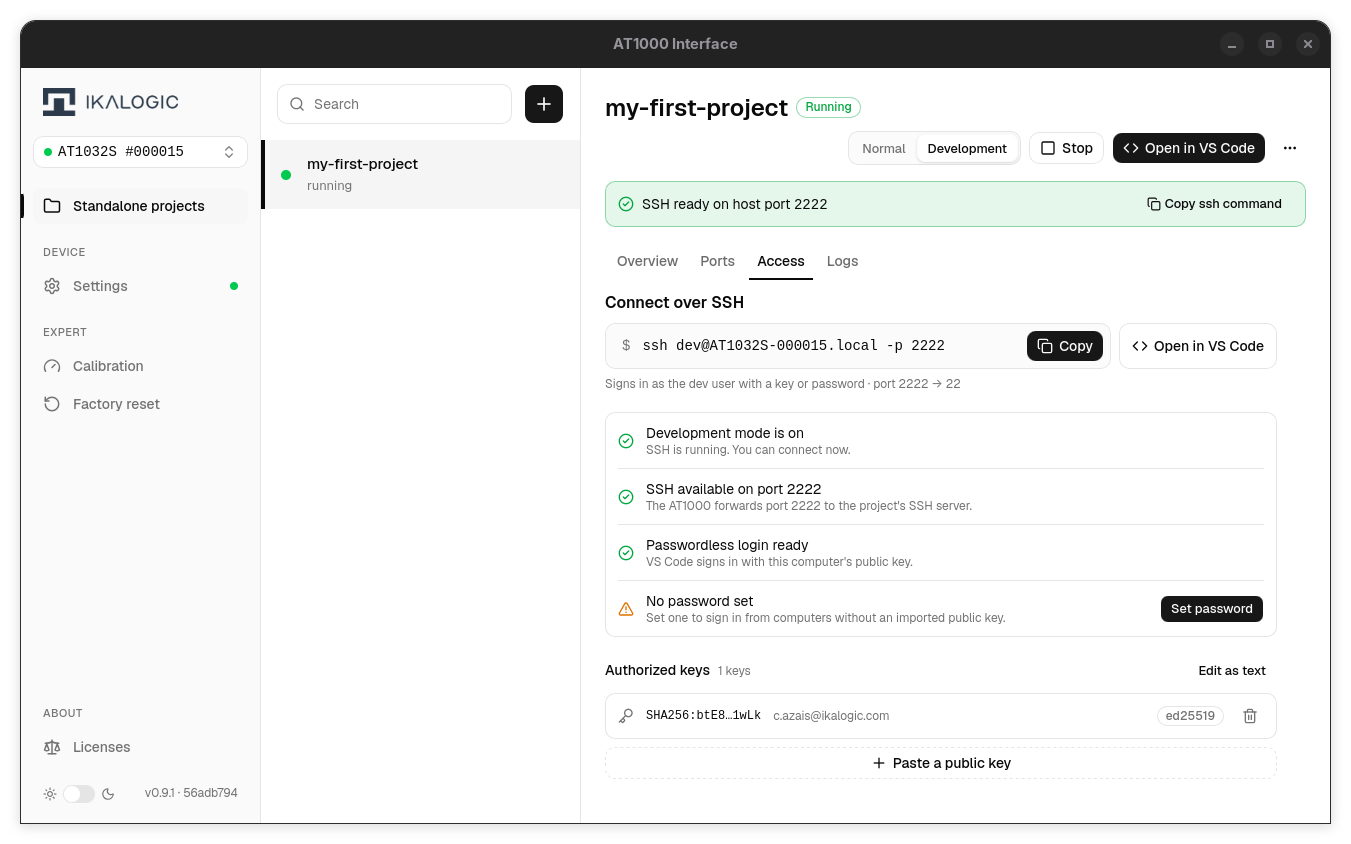
The tab shows the ssh command for the project, with Copy and Open in VS Code. With the default mapping and <serial-number> replaced by your device's serial number, the command is:
ssh dev@AT1032S-<serial-number>.local -p 2222
Below it, a checklist shows what the connection still needs:
- Development mode - select Development in the project header, then run or restart the project.
- SSH port - Publish SSH port maps host port 2222, or the next free port, to the container's SSH port.
- Passwordless login - Import public keys authorizes the public keys in your computer's
~/.sshfolder. - Password - Set password sets the
devuser's password, for computers without an authorized public key.
Under Authorized keys, select Paste a public key to authorize another computer's key, or Edit as text to edit the whole list. While the project runs in development mode, the strip above the tabs shows the SSH host port, with Copy ssh command.
View logs and troubleshoot
The application does not start or shows an error
Open the project's Logs tab to read its application output. Check for startup errors, such as missing dependencies or application files.
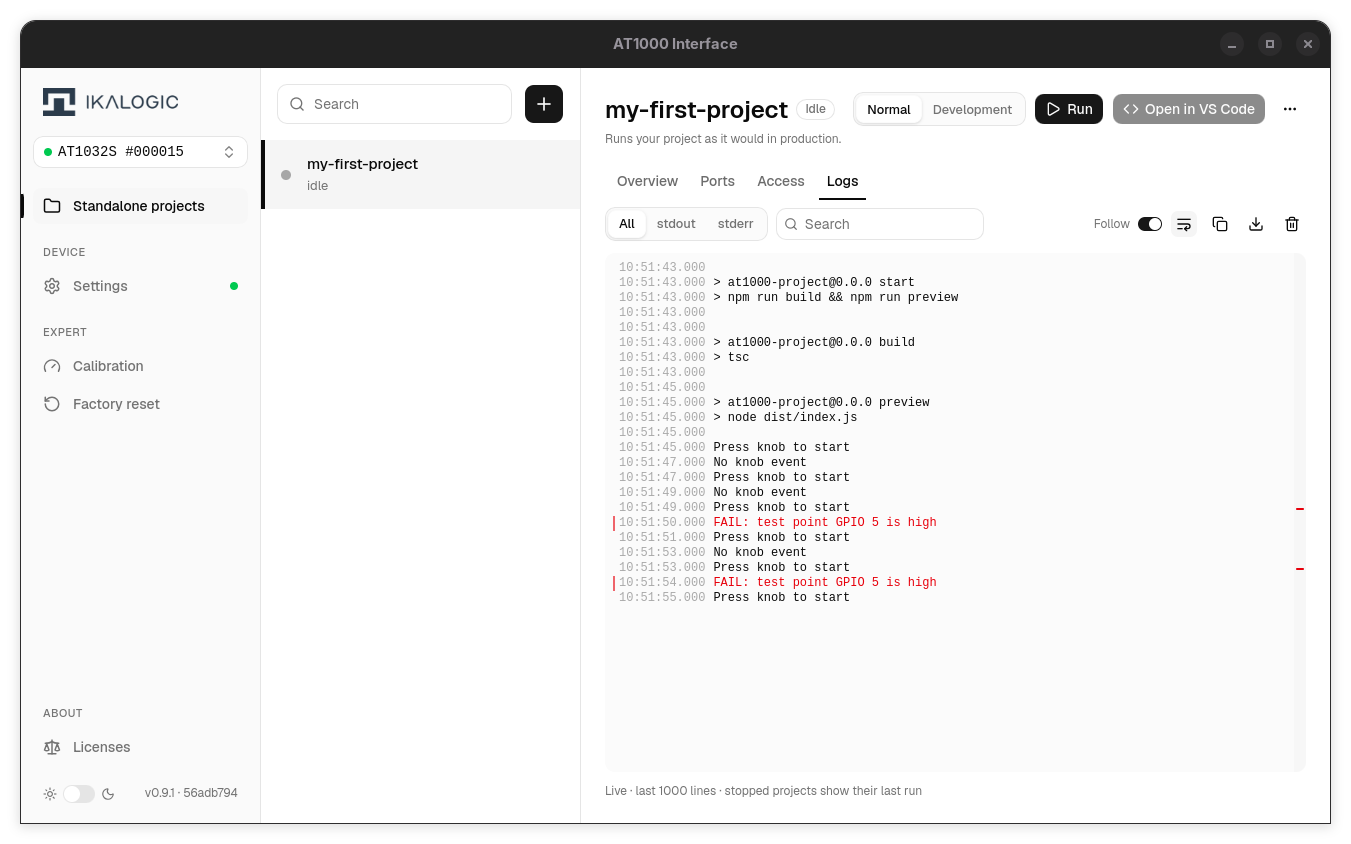
The tab streams the output of the current run, or of the last run for a stopped project, and keeps the last 1000 lines. Error output (stderr) is shown in red and marked on the scrollbar, so you can jump to an error in a long log.
- All, stdout and stderr filter the output streams.
- Search highlights matching text. Press Enter or Shift+Enter to jump to the next or previous match.
- Follow keeps the newest lines in view. Scrolling up turns it off.
- The toolbar buttons wrap long lines, copy or download the log, and clear the view.
If you ran the project in Development mode, the application does not start automatically. Run it from the SSH terminal while editing, or run the project in Normal mode to use its startup command.
A network service in the project is unreachable
Open the Ports tab to check the project's port mappings. Check that a mapping exists for the service's port, and use the corresponding AT1000 host port when connecting.
Check the Logs tab to see whether the application started its service successfully. A port-publication failure does not undo a successful project start or stop, so check the project state and port settings separately.